Date: Sep 17, 2012  |  Written by Laura Hardgrave  |  Posted Under: Article, Guides  |  DISQUS With Us: No comments yet

Next up in our series of Guild Wars 2 area completion guides is Diessa Plateau, the second charr racial area, intended for players between levels 15-25. The area’s home of some interesting challenges, included three jumping puzzles, a cow-flinging catapult, and plenty of old, decrepit ruins waiting to be explored. To get there, travel to The Black Citadel, and head north through Memorial Quadrant and through the portal.

These completion guides are intended to help players achieve the completion series achievements. We’ll just be covering the more difficult-to-find Points of Interest, all of the Vista Points, all of the Skill Challenges, and the area’s jumping puzzles. Also included is a humungous map, with every major Point of Interest (PoI) and Waypoint (WP) labeled. Points of Interest have black-bordered text, Waypoints dark blue. Renown (heart) quests are also labeled with their suggested level. This should help you decide on a path of adventure, if you so choose.

I’ve also labeled nearby portals to other maps as well as the entrances to the map’s secret jumping puzzles. When reading my tips for completing the jumping puzzles, make sure to take a peek at the pictures that are linked at some of the tougher areas.

Date: Sep 13, 2012  |  Written by Jason Dodge  |  Posted Under: Article, Editorial, News  |  DISQUS With Us: No comments yet

Date: Sep 10, 2012  |  Written by Laura Hardgrave  |  Posted Under: Article, Guides  |  DISQUS With Us: No comments yet

Ah, Metrica Province– home of tiny asura, cool floating staircases, cube-shaped elevating objects, some weird frog dudes, and lots and lots of exploration to be had. While running around, it’s pretty easy to lose track of a Vista Point or get stuck on how to find the way to that Point of Interest. Look no further– we’ve got all your answers.

For these condensed-style guides, we’ll just be covering the more difficult-to-find Points of Interest, all of the Vista Points, and all of the Skill Challenges. Also included is a humungous map, showing all the pockets of the map, with every major Point of Interest (PoI) and Waypoint (WP) labeled. Points of Interest have black-bordered text, Waypoints dark blue. Renown (heart) quests are also labeled with their suggested level. This should help you decide on a path of adventure, if you so choose.

I’ve also labeled nearby portals to other maps as well as the entrance to the map’s secret jumping puzzle area. Stay tuned for additional 100% completion maps, as well as detailed guides for the more difficult jumping puzzles.

Date: Sep 6, 2012  |  Written by Jason Dodge  |  Posted Under: Article, Guides  |  DISQUS With Us: No comments yet

The following guide will bring you from newbie chef to Master in mere hours, and it’s pretty easy to do. You’re going to have to do some Trading Post shopping if you haven’t collected many ingredients, but the guide keeps gathered material to a minimum.

There are simple ingredients that you can find from the Chef Vendor for karma and copper. These items are Water, Flour, Butter, Sugar, Egg, Chocolate Bar, Oil, Vinegar, Buttermilk, Bell Pepper, Black Peppercorn, Salt and Soy Sauce.

One thing to note: The karma vendor ingredients require you to complete hearts to access. The highest level heart required in this guide is level 69. Obviously, there are other alternatives if you have access to other ingredients.

Date: Sep 4, 2012  |  Written by Laura Hardgrave  |  Posted Under: Buzz  |  DISQUS With Us: No comments yet

One of the most enjoyable things about crafting in Guild Wars 2 is the fact that if a recipe calls for materials in a lower level area, farming those materials isn’t necessarily a waste of time. Experience, gold, karma, dynamic events, and map completion all come attached with your crafting goodies. Exploration at any level is encouraged and rewarding.

So, where are some good crafting material farming hotspots? Need help remembering what mobs drop Bone Shards or Vials of Thick Blood? GW2Guru has a pretty awesome list that’s currently a work in progress. Here’s a sample:

Format: Material — Zone / Area — Monster Type — Monster Level — [Area Level]

Vial of Thin Blood — Kessex Hills / Manfire Hills — Skales — XX — [YY]
– Gendarran Fields / Lake Gendarr — Skales — XX — [YY]
Bone Shard — Diessa Plateau / Holystone Caves — Grawl — 25 — [26]
Small Claw — Harathi Hinterlands / Guardian Lake – River Drake — 34 — [34]
Pile of Shimmering Dust – Gendarran Fields / Lawen Ponds — Risen — 28/29 — [27]
Small Fang Diessa Plateau / Holystone Caves — Grubs — 25 — [26]
Small Scale — Gendarran Fields / Lake Gendarr — Barracuda — XX — [YY]
— Harathi Hinterlands / Guardian Lake – River Drake — 34 — [34]
Small Totem — Diessa Plateau / Holystone Caves — Grawl — 25 — [26]
Small Venom Sack — Diessa Plateau / Holystone Caves — Grubs — 25 — [26]
— Kessex Hills / Overlord’s Greatcamp — Fireflies — XX — [YY]
— Gendarran Fields / Cornucopian Fields (east) — Wurm Hatchlings — XX — [YY]
— Gendarran Fields / Vigilant Hills — Fireflies — XX — [YY]
— Gendarran Fields / Overlook Caverns (vista) — 28 — [YY]

Head on over to the complete thread to see the full list.

Date: Aug 31, 2012  |  Written by Jason Dodge  |  Posted Under: Article, Guides  |  DISQUS With Us: No comments yet

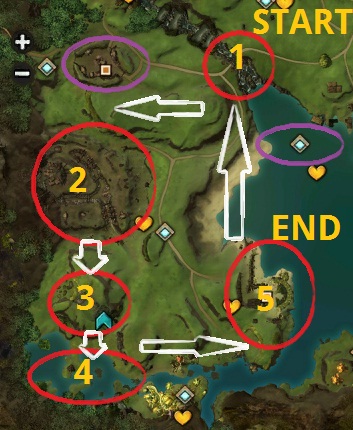
There are a lot of places in the game where you can follow an event train from beginning to end for multiple rewards and it then cycles back to the beginning. The biggest one we’ve found is in Kessex Hills on the western side of the map. This is an efficient way to level (if efficient leveling is your goal) up through the 40s.

The start point is the bridge at the northwest corner of the lake. Once finished you won’t have to wait very long for the event to start over again. There are also two nearby events (marked off in purple) that might randomly show up that you can diverge and complete during your cycle.

This rotation works extremely well at all level ranges. The experience starts to lag down after level 30, but is still completely viable. It’s a very good way to earn karma and gold as well.


Here is what to expect at each step:
 

  • Point 1: Break centaur worker morale to prevent bridge repairs. Reduce morale to 0%.
  • Point 2: Dispatch the Harathi Lieutenants. Kill all three.
  • Point 3: Kill the Harathi Overlord.
  • Point 4: Stop the Risen Krait from building their army. Kill all four, not labeled on map.
  • Point 5: The END point has it’s own rotation of events:
    • END 1: Destroy the bandit cannons before the ore shipment is ready. Kill five canons.
    • END 2: Stop bandits from collecting ore for a centaur supply shipment. Kill all the miners.
    • END 3: Defeat the champion bandit foreman before he finishes collecting ore for centaurs. He has two forms: Mech and Human.

There are a few other places where you have a system like this after level 40. We’ll bring those to you as soon as we can.

Date: Aug 29, 2012  |  Written by Jason Dodge  |  Posted Under: Article, Guides  |  DISQUS With Us: No comments yet

If you’re a Ranger and looking for a specific pet, go no further, here is a full list of all the Ranger pets and where you can find them. Continue reading for the full list.

Date: Aug 28, 2012  |  Written by Jason Dodge  |  Posted Under: Article  |  DISQUS With Us: No comments yet

Mesmers are a tricky profession; they were one of the last to be introduced and almost universally thought of as underpowered through the vast majority of BWEs. What a lot of people don’t realize is that Mesmer is a very fun profession to play and actually quite powerful if you understand the fundamentals. With the buffs they received just prior to the launch they achieve parity with other DPS classes by the time you achieve level 80, or jump on one in sPVP.

Mesmers are extremely dependent on traits, much more than any other class. For example, using arbitrary, made up numbers, an Elementalist starts off with 80% of its full potential and gain the last 20% of its power via traits as he or she levels up to 80. The Mesmer, on the other hand, probably starts off at 40% of its full potential and their traits give it 60% of its strength. Because a bulk of a Mesmer’s damage is based off of illusions one way or another, there are a series of traits and skills that make them do more damage and survive longer that are essential to almost every build.

Date: Aug 24, 2012  |  Written by Loe  |  Posted Under: Article  |  DISQUS With Us: No comments yet

During the final Beta Weekend Event, I got a chance to play among the trees and frolic in the leaves as a sylvari. While doing so, I explored the sylvari starting area– Caledon Forest. The area is one of the most beautiful I’ve seen in the game so far. If you choose to explore Caledon Forest, you’ll find plenty of lush foliage, underwater treasures, and forts gleaming in the sun along with dangerous enemies, sharp terrain, and swamp creatures. As a bonus, most of the events and storylines are quite enjoyable. I highly recommend a scenic tour– just, uh, be sure to take a few weapons or spells along on the journey.

Now, Guild Wars 2 isn’t really a game where walkthroughs are needed, and in fact exploration and running off the beaten paths is sometimes encouraged and extremely rewarding, but I do think there are times when a rough guideline of sorts can come in handy, especially for players new to GW2 and many of its unique mechanics. With that philosophy in mind, I have created a guide of sorts for the Caledon Forest area. Its emphasis is on the renown heart quests, and suggests a path that branches them together. Players are free, of course, to follow whatever patch they choose– that’s the beauty of GW2– paths can vary quite considerably. I’ve also included a nifty map of the entire area, showcasing points of interest.

Date: Aug 24, 2012  |  Written by BJ Shoemaker  |  Posted Under: Article, Guides  |  DISQUS With Us: No comments yet

Part 1: Tutorial and Introduction

Regardless of your choice of your personal story, as a human, your tutorial level will start you with a quest to protect the people of Shaemoor. Directly in front of you as you start out is Corporal Beirne, he has a green quest icon, and is calling out for your assistance. He will request that you head to the Inn, which is a simple enough beginner task. Just continue south and run to the large green star on your mini map.

I don’t recommend deviating from this goal, because there’s not a lot of value in Guild Wars 2 to grinding mobs. There are plenty of level 1 centaurs that are attacking the village, however they yield approximately 2 exp per kill, and you need 2,000 exp to hit level 2. Also, because you’re in the tutorial level, they do not count as kills towards your achievements. Along the way, however, do be sure to talk to villagers and tell them to go to the inn for their safety. You will be rewarded with 2 Karma points for each villager that you send to the inn.

Date: Aug 23, 2012  |  Written by Terra  |  Posted Under: Article, Guides  |  DISQUS With Us: No comments yet

This FAQ explains what you need to know about gear and how its attributes are distributed. I'll predominantly aim this at level 80 equipment as we can talk about all equipment rarities. The reason for this FAQ is:

  • To explain how attributes are distributed at level 80
  • To answer some common misconceptions
  • Illustrate the methods and difficulty of obtaining equipment

If not stated, the tables in this FAQ are from the GW2 wiki or self made.

Disclaimer: This faq is based on fact or logic based on evidence. Nothing is assumed because we all know what 'assume' does to you and me. As such, there may be other ways of obtaining gear or additional information not known to us at this time. However, I do not wish to speculate as this only causes confusion. If any pertinent information is sent to me that will improve this faq then I will update it.

Date: Jul 2, 2012  |  Written by Laura Hardgrave  |  Posted Under: Article  |  DISQUS With Us: No comments yet

Guild Wars 2 has eight crafting disciplines to choose between, and players can have two. They can also have all three of the gathering disciplines, which thankfully aren’t tied to any of the crafting trades. Players can choose to become a jeweler as one of their crafting disciplines, which allows the player to craft jewelry– amulets, rings, and earrings, as well as upgraded gemstones to use in equipment. Both will be undoubtedly useful in GW2, and hey– every profession benefits from shiny things, right?

Mining and logging are the two gathering trades essential to the jeweler discipline. Logging may not seem useful on the surface, but one of the gems needed– amber– is found while chopping down logs. Gemstones are randomly found while mining and logging all types of gathering nodes, and the chances of finding them can be raised by using special gathering tools. The appropriate gathering tool must be equipped while gathering (luckily all three– mining pick, logging axe, and harvesting sickle– can be equipped at once), but they do run out as you use them. For long gathering sessions, keep a few stacks handy.

Date: Jun 19, 2012  |  Written by Jason Dodge  |  Posted Under: Buzz  |  DISQUS With Us: No comments yet

This video has been seen by many people already, but that is probably not enough. Enigmius gives us an in-depth editorial on the different ways to level and progress your character in Guild Wars 2. We’ve seen a lot of different people discuss on forums that they were confused on what to do in GW2, or that they didn’t know what to do and felt lost. This is hardly surprising as a generation of MMORPG gamers have been conditioned to go from golden exclamation mark to exclamation mark. and that is definitely not the case with Guild Wars 2.

So continue reading and check out Enigmius’ video where he goes over all the different sources of experience and the general flow of how the game is played. He’ll discuss W3, hearts, events, crafting and more!

Date: May 23, 2012  |  Written by Pyros  |  Posted Under: Article  |  DISQUS With Us: No comments yet

NOTE: the following article is based off the BWE1 build.

Mesmers are magical duelists who rely on deception and confusion to keep their opponents in check. Indecision is their greatest ally. Using powerful illusions to distract, they make sure they never go toe to toe with an enemy; they use their powers and tactics to set up an unfair fight.

Mesmers were the last class revealed in Guild Wars 2 and also one of the most anticipated when it was revealed. This was because Mesmers in Guild Wars 1 had a prestigious position as the most technical and interesting class to play. The Mesmer reveal video showed many interesting new mechanics such as illusions, group invisibility, blinks and showed unconventional weapon choice for a caster such as greatsword, swords and pistols. Now that the beta is upon us, let’s take a look at the Mesmer class and find out how exactly it works and plays. Obviously since this is an early beta phase, all of this is subject to change in the coming weeks/months until and even after release.