
Ah, Metrica Province– home of tiny asura, cool floating staircases, cube-shaped elevating objects, some weird frog dudes, and lots and lots of exploration to be had. While running around, it’s pretty easy to lose track of a Vista Point or get stuck on how to find the way to that Point of Interest. Look no further– we’ve got all your answers.
For these condensed-style guides, we’ll just be covering the more difficult-to-find Points of Interest, all of the Vista Points, and all of the Skill Challenges. Also included is a humungous map, showing all the pockets of the map, with every major Point of Interest (PoI) and Waypoint (WP) labeled. Points of Interest have black-bordered text, Waypoints dark blue. Renown (heart) quests are also labeled with their suggested level. This should help you decide on a path of adventure, if you so choose.
I’ve also labeled nearby portals to other maps as well as the entrance to the map’s secret jumping puzzle area. Stay tuned for additional 100% completion maps, as well as detailed guides for the more difficult jumping puzzles.
Metrica Province’s 100% Completion and Cheatsheet map (click to show full size version):

Now, let’s dive into some of the more difficult Vistas, Points of Interest, and Skill Challenges, shall we?
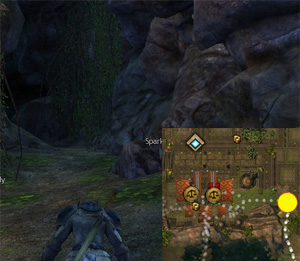
Wildflame Caverns Vista, south of Soren Draa:
This one actually doesn’t appear on the map until you begin looking for it. To do that, head to the location shown by the giant yellow dot on the screenshot to the right, which is in the actual Soren Draa hub area, east of the trading post/repair vendors. Keep to the south wall, and you’ll run into a cave. The cave’s entrance is also shown in the screenshot. Once in the cave, the Vista’s an easy climb up a small hill amidst the lava.
West Hinterlabs Vista:
Head north a bit from the entrance to Incinergen Labs, run up the moss-covered slope that makes up the building’s edge, then hop up the floating rock staircase at the peak.
East Hinterlabs Vista Point:
Head to either side of the Splorge Metamystics Lab’s entrance, then hop up the staircase. Scale the peaked stone pillar (from the back worked well for me).
Skill Challenge south of Loch Jezt, at Durotl Grounds:
Kill the Hylek.
The Funhouse Skill Challenge:
Enter and follow the second passage. Kill the trio of enemies, including a veteran golem.
Vista north of Sunshade Caves:
Go through the cave. Entrance starts at the yellow dot shown in the screenshot below. Hang a right on the way through, and the Vista is right outside. Alternatively, entering from the Parnna’s Gate side works too.

Oola Skill Challenge:
North of Akk Wilds, talk to the knob on the door to activate a little reading comprehension quiz. It’s quite easy, but if you’re lazy, here are the answers:
1) Oola, lab genius. 2) I am not in charge. 3. Necromancy and golemancy. 4) We embody magic.
Inside, is the Old Oola Lab PoI.
Desider Atum Vista:
In the middle of the crafting NPCs, there is a set of floating stairs. Head up them, run to the Jeweler NPC, hop off the edge, then jump down to the stone peak where the Vista is.
Voloxian Passage Vista:
Head to the southeast corner of the eastern building of Brill Alliance Labs. Head up the floating staircases, then toward the other end of the top level, through the grassy area.
Michoan Marsh Skill Challenge:
Click the box on the pillar to activate three enemies. They reset if you kite them, which makes it possible to solo.
Old Flamen Lab PoI:
Here’s a trick for this one– simply go to where the mark is in the swamp area, run up against the clear wall. You’ll get credit.
Biocauldron Alchemical PoI:
This is in the swamp area too. Directly west of the Skill Challenge is the entrance. You only have to step in a few steps to unlock the PoI.
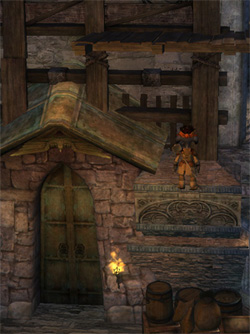
Arterium Haven Vista:
Head south of Artergon Woods. Go inside the courtyard, and up the southwest tower. Climb the second tower in the same area. Then hop on top of the barrel stack. The screenshot to the left has a pretty good view of the barrels and the next couple steps. Next, hop to the little ridge (that’s the spot my asura is on in the picture), the hanging top of the doorway, then on the wooden planks. Hop all the way up. At some point you’ll have to scoot on the edge then hop to make the next perpendicular plank.
Cuatl Morass Skill Challenge:
Clear the area, get the goo, open your inventory, and use it.
Luminates Plant Skill Challenge:
Contrary to the map, this one’s actually underneath the main structure. Head out as if you’re leaving, then jump underground where there’s a cube moving up and down. Follow the passage, kill any enemies in the way, and commune away.
Vista south of Muridian Uplands, in C.L.E.A.N. Station:
Approach from the eastern side of the station, where the little blocks form two steps. On the second step, jump across to the blue floating overhangs. Hop to the top overhang, then on the hill. The steepest hill is scalable to the east side.
Vista right outside Inquest Outer Complex:
This one’s actually outside the complex. Run to the icon following the river’s shore– you’ll eventually run right to it.
Inquest Outer Complex Skill Challenge:
This one’s in the thick of the complex, and summons a golem to defeat.
Inquest Outer Complex PoI:
This one’s a little confusing. It’s not actually reachable via the Complex entrance, and must be reached by a portal. The portal’s way on the other side of the map, where the Transfer Gate PoI is, which is west of Greyfern Expanses and north of The Anthill. Pictured below is where to find the portal exactly, which is also shown on the full size Metrica Province map.
![]()
Thaumanova Reactor Skill Challenge:
This one’s outside the reactor. Summons three Embers to defeat.


LET'S GET SOCIAL